Hi, guys. Today I'm gonna show you how to create an x-ray shader in 3ds Max. Nice thing is, this shader is using only procedural map, so we don't need to create any texture map our own.
 |
| X-Ray Shader in Autodesk 3ds Max |
So first thing first, we need a reference of how an x-ray image looks like in real world. It's always been a good habit for us, as an artist, to look for real-world reference before we start making anything. So, I googled a little and found this image:
 |
| x-ray crab | source: nationalgeographic.com |
It's an x-ray crab. :D ....now, let's start a brief research of the image.
- First, notice that x-ray makes the object looks hollow. The intensity of the outer part of the objects is high and gradually decrease when it comes to the inner part.
- Second, the overlap parts have even brighter intensity. This effect is similar to when we use 'Add' in Photoshop layer mode.
- Third, we have some noise when it comes to the inner part.
So, that's our quick examination. Let's get into 3ds max and we'll start the shader creation.
Open 3ds max, create an empty scene. Now hit
M to show our
Material Editor window. Grab an empty material slot and switch it to a
Standard Material if it isn't.
 |
| Set to Standard Material |
Click on the little square beside the
Opacity and select
Falloff map in the
Material/Map Browser window. The
Falloff map generates a value from white to black, based on the angular falloff of the face normals on the surface of the geometry. Well, that words might be too difficult to understand, so when you see the result once the map is applied, you will understand.
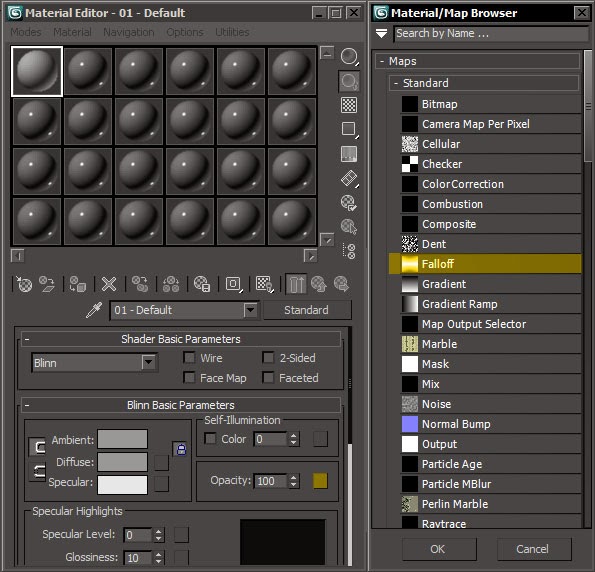 |
| Use Falloff for Opacity map |
The
Falloff map will make our material have 100% intensity on the outer side and gradually decrease to 0% in the inner part. Thus, our shader looks like it's hollow in the inside. We can also adjust the intensity by playing with the black and white color in the parameters.
Now, drag our
Opacity map to our
Self Illumination map, make an
Instance copy. X-ray creates no shadow, so it's a good idea to use the
Falloff map also in the
Self Illumination map so that our shader will 'glow' and pop out. Don't forget to check on the
2-Sided too.
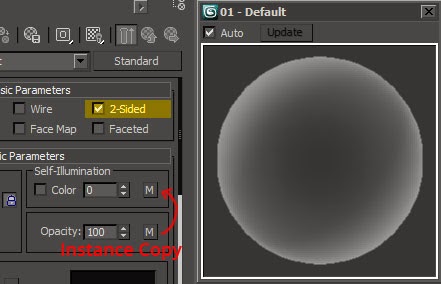 |
| Make an Instance Copy of Falloff map to Self Illumination |
Remember the 'additive' part in our brief research? We can do that by checking on
Additive in the
Extended Parameters rollout. Now we are a little bit closer to our x-ray.
 |
| Use Additive Type |
Click on the
M square button to adjust our
Falloff map parameter. Since we use our
Falloff map in the
Opacity slot, then we can play the opacity of our material by adjusting the black and white color. White means 100% opacity, black means 0% opacity, and grey means between them. Adjust the black color to a dark grey so that our material won't be 100% transparent in the inside.
Now you might want to test the material. Create an object, I used
Torus Knot, in the scene and hit render. You should get something similar to this image:
 |
| Torus Knot with X-Ray Shader |
Nice one, eh? :D
So this is our basic shader for x-ray. We can adjust and playing with the maps to create more detailed effect. For example, we can use
Noise map in our
Falloff map to make some noise in the shader too.
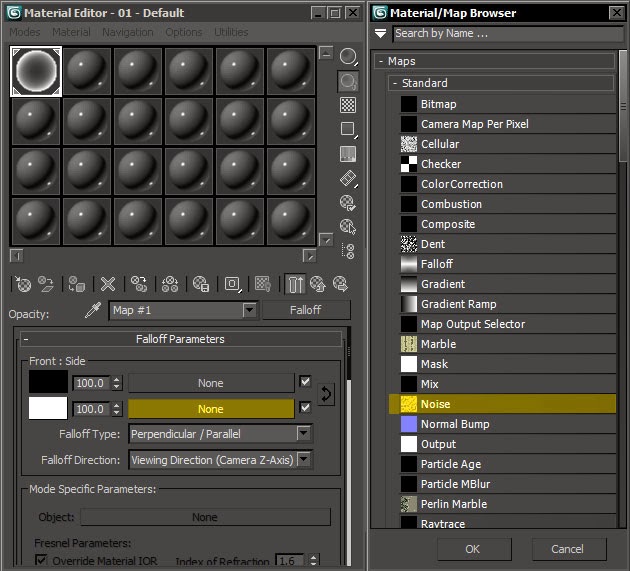 |
| Use Noise Map to Give Detailed Look |
 |
| Some Parameter Tweaking of the Noise Map |
I also adjust the diffuse color to a bluish one and got something like this:
Well of course you can still play more with the shader to achieve better result. You might need to adjust some of the size parameters in the maps to fit your model. By the way, the more detail your model is, the better you will get the effect.
If you're interested, I want to share my x-ray shader that I used for the T-Rex above. Basically it's the same shader I used from above tutorial, but with a little tweaking and some more maps for the detail. You might learn something from this.
DOWNLOAD:
X-Ray Shader
This is a .max file created using 3ds Max 2011 (you can't open this in older max version). Open the file then open the
Material Editor and you'll get the shader there.
I hope you find this tutorial helpful and have a nice day. :D
Cheers!


Positive website, where did u come up with the information on this posting? i'm thrilled i discovered it though, sick be checking returned soon to discover what extra posts you consist of. Gmod game
ReplyDeleteAlmost all will agree success in internet marketing will often hinge around whether or not a decent website is employed as a promotional tool. Most do understand the necessity of creating an excellent website. All online marketers know that having quality, targeted website content is of the utmost importance for getting traffic to your site. Formal Shoes
ReplyDeleteSo nice I am enjoying for that post as for u latest version of this Security tool Available
ReplyDeleteautodesk 3ds max crack
faststone capture crack
systools hard drive data recovery crack
dragon naturally speaking crack
autodesk 3ds max crack
ReplyDeleteNo Deposit Bonus Code at Grades Casino
ReplyDeleteThe online https://febcasino.com/review/merit-casino/ casino worrione offers 100 free https://octcasino.com/ spins without deposit for no wagering requirements. gri-go.com This bonus is one of the most popular and most well-known 바카라 사이트